Thursday, September 29, 2011

straight and narrow

Back in March, when Cheryl came to visit, we brainstormed a bunch of quilt ideas. One of them was for an almost whole cloth quilt. We split two pieces of neutral solids and we challenged each other to make a quilt that really focused on the quilting. It was a fun challenge.  
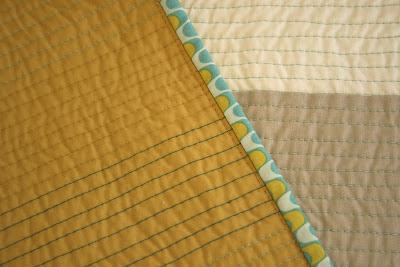
In my original vision for this quilt, I pictured something loud and colorful for the backing. But I had the ochre solid in my stash, and I thought it would be a good choice IF I could find that "just right" binding fabric. Some rummaging through my stash yielded this great squiggle fabric that matched the backing and went well with the front. Thrilled (and a little bit shocked) with my discovery, I pulled thread colors to match and I was all set!
Enter basting an a ton of straight line quilting, and here you have my straight and narrow quilt! [I reserve the right to call it that, even if very few of my lines are straight! :)] I started by marking quilting lines every 6", but then I went back and marked every 3". The rest I eyeballed as I quilted lines 1/4"-1/3" apart. A TON of lines. I changed thread colors randomly throughout the quilt. There was some (much) frustration with the quilting, but I worked through it. It's good to learn something with every quilt you make!
The quilt fell and landed beautifully when I was taking photos. I love seeing the contrast from the front to the back with the binding all at once.
The backing is fabric is an organic cotton that I found for $1/yard (!!!) at Hancock Fabrics. When I bought it I couldn't decide if it was ugly or so, so good. I decided it was deliciously ugly. :) I bought 5 yards that day and knew that someday I would use it for something! I'm so glad I did! My husband couldn't see my vision for it at the time (he thought it was straight up ugly!) but now he sees that it's not bad at all. The color scheme gives this quilt a decidedly fall feeling. Perfect timing! It was so fun to work in colors out of my normal color scheme.
This fabric is from my dear friend Linda. (Thanks, Linda!) I love, love, LOVE it as the binding. I attached it with my machine on both sides. That top stitching sure makes me happy. :) It matches the machine quilting so nicely.
I will admit that my quilt turned out quite different than I had originally anticipated, but the results are something I LOVE. I think it will be an instant favorite in our family. I wish you feel the quilt, because the texture is incredible! It measures 50" x 63".

Make sure to check out what Cheryl did with her quilt here. It's stunning!

Wednesday, September 28, 2011

setting seams

I made this bee block for Bonnie yesterday and all the while I was thinking, 'boy, i sure could benefit from a precision piecing class.' Those little red blocks finish at 1" square! The block is 9.5" total. That leaves very little room for error. I love piecing tiny things, but I definitely have room for improvement in the accuracy department.
Just as I was finishing up this block, I recalled reading/hearing about setting seams. (There is a short video here that explains it well.) I was somewhat skeptical, having tried it in the past and didn't notice a big difference. I decided to give it another try yesterday (what did I have to lose?) and you know what? I really do think it helps. I just might be a convert.

So now I'm curious...do you set your seams? Do you think it helps? I'd love to hear your thoughts.

Monday, September 26, 2011

quilt camp

On Saturday, I taught a beginning quilting class to some ladies at my church. I'm hoping to get several of them hooked on quilting so I have yet another sewing circle of ladies in my life. (So far I have two circles that I'm a part of. One more wouldn't hurt!) Actually, I did the "one day quilt camp", as we called it, to teach the basics of quilting, but also to work on a few community quilts to donate to Margaret's Hope Chest. It was such a fun day!
Here's a shot of the set up. My husband had a grueling week at work, but despite that, he went along with me on Friday night to help me hang the quilts and set up the room. He's such a great guy!
I had no shortage of samples to pull from around my house to use for my class. :)
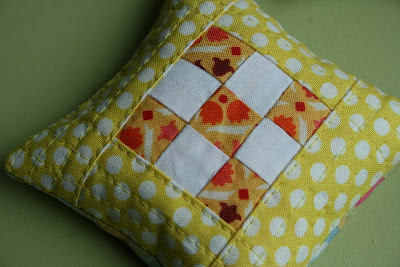
I made a pin cushion as a thank you for each person who attended the class. (They loved them. Yay!)
I squealed a bunch while I was making these...each pincushion finishes at only 3.5" square!
I taught how to make a 4 patch, pinwheel, log cabin block and string block. The ladies did fabulous at all of them!
Here's a group shot with the string blocks we made. I thoroughly enjoyed watching them play with colors/fabric selection. Everyone did so great, and they all had their own personality reflected in their block. It was so much fun to see that process taking place.

I decided all over again that I love teaching classes. It's so tiring, but as exhausting as it is, it is equally-if not more-rewarding! I also decided that the term "teaching" is a little intimidating. I'd rather think of it as "sharing my love of quilting" with others. Now THAT doesn't sound intimidating. At. All.

Happy Monday to you!

Thursday, September 22, 2011

fraternal twins

These two lovelies are made from the brand spankin' new Cabbages and Roses fabric from Moda. I believe that the fabric was officially released today. This fabric could. not. be. prettier! I started by cutting 9" squares (from a fat quarter, so there was virtually no waste) and then I made half square triangles. I didn't want to chop up the fabric any more, because I wanted to show off the lovely large prints. I debated long and hard on the layout, because with HST's there are so many possibilities! Too many, really. I was going to make one twin sized quilt, but in the end, I just couldn't shake the idea of separating the colors and making two quilts. So, two quilts it is!
For the back of the blue and green quilt I found this vintage fabric in my stash that had belonged to my Grandmother. I couldn't believe how well it coordinated with the front and I had just the right amount for the back. Serendipitous! I was giddy at this discovery. Ok, maybe was isn't the right word. Maybe I still am.
For the binding, I used a navy dot from the Children at Play line by Sarah Jane. (Yes, I am completely obsessed with these dots!) I love how the navy frames the quilt and pulls out the dark blues in the quilt top. You can't go wrong with dots on the binding! The navy is just so crisp and classic.
To quilt this one I made large loops following the diagonal lines in the quilt top. It went smoothly and quickly. The not-so-dense quilting coupled with the weight of the backing makes it a soft, smooshy and cozy quilt that will only get better with use.
For the back of the pink quilt I was going to use a cream sheet, but at the last minute I changed my mind and pieced the back. I used fabric that Cindy had so generously sent me this summer (thank you, Cindy!) and I worked the pieces like a puzzle until I came up with this layout. I love how it makes this an over the top girly girl quilt. The addition of the yellow is especially sweet, I thought.
For the binding, I chose this Denyse Schmidt dot. It's not a predictable choice for this style of quilt, but I like that unexpected twist. The red dots pull out the red accents in some of the florals, and the pinks don't match perfectly, but close enough, which I actually kind of like. The binding is a little bit sassy and it makes me smile.
To quilt it, I did an all over stipple. I thought about doing loops again, but I wanted to change the quilting and see what it did to the look of the quilt. I like the results of both quilting styles, really.
When I was debating layouts, as mentioned earlier, I really wanted to make one twin quilt, because it could be used either on a bed or as a lap quilt. But now that they are both finished, I'm so glad that I made two smaller quilts. There is something so special about a pair of quilts, you know?
Both quilts were finished in a jiffy thanks to my new found love of machine binding. Hurray for that!
Each quilt measures 48" x 64". 
I'd like to say a big thank you to my friend, April, for letting me use her clothesline for the photo shoot today.

Wednesday, September 21, 2011

paradox

I have completely fallen in love with hand quilting. Thanks to many of your suggestions on this post, I made myself use a thimble. It's getting easier with practice, and my finger feels so much better. I love the look of hand quiting, and the process is so soothing. I'm happy to say that I am over half done with this quilt. Yahoo!

(A slightly hilarious side note...my thimble is turning my finger green...just like a cheap ring would. So much for what I thought was my heirloom thimble!)
I have also completely fallen in love with machine binding....on both sides. This is the 4th machine bound quilt that I've done, and I think it looks pretty darn good! I love how the top stitching is visible on the front. I love how QUICK it is. This afternoon I was able to start making dinner, wrote out a class outline AND finished the binding on this quilt completely. Sweeet! That is good, no, great, news for my WIP pile!

Tuesday, September 20, 2011

favorite

This is my family's favorite quilt. It is also the one and only store bought quilt that we have in our possession. (Can I just say, "Ouch!"?)
My husband and I bought it from a discount store a few years before I learned how to quilt, so it's probably 13 years old. It certainly has seen better days, but it remains everyone's favorite. We've had many picnics on it, and spent countless summer days with it spread out on the lawn, just hanging out together. It's big (king size) and super soft and smooshy, so I really can't blame them for liking it so much. :)
The fabric is worn on both the front and back, and on the sides, too. The worst parts are shredded, as shown above. I thought about trying to repair it, but I wonder if it's beyond hope. I thought about saving the batting, but it's just polyester, so it's probably not worth it. I thought about making a new front AND back, and encasing the whole thing inside a "new" quilt (after I trim off the dangling bits) but I'm afraid that it would end up being a big lumpy mess. Again, probably not worth the trouble. On the other hand, just the thought of throwing the whole thing away almost gives me hives. I mean, it's a quilt! Throwing it away just doesn't seem right.

So, what do you think? Should I try to save it? Or toss it and just start over?

Monday, September 19, 2011

merry minis quilt top

I had the chance to sew more than I expected to on Saturday, which is always a pleasant surprise. I started playing with the 4 patches I had made from the merry mini fabric line from Connecting Threads. The fabric is cute and sweet and has a very vintage flavor to it. I knew I wanted to put the blocks up on point, so I started there. I'm so used to using 2" finished blocks, that the 4 1/2" blocks felt HUGE to me!
They looked decidedly, um, old fashioned. I was stuck for a bit, until I decided to add some setting squares in the blank spots. I added a few dots from Children at Play line (LOVE THOSE DOTS!!!) to help update things a bit. I also added a few other basics from my stash and a few prints from this line, too, even though they aren't Christmas prints. They work so well together! It's funny, because without intending to, I ended up making a variation of this quilt. You can find the measurements here
The background fabric is a sweet, sweet polka dot print, also from Connecting Threads. (It's picnic dot in mint.) It's so good that I had to stock up...I think I bought 5+ yards. :) I love that the background is something other than plain ol' white. I branched out and I LOVE it!
The quilt top is about 55" x 66".
Now it's sitting on the "to be quilted" stack. It has plenty of company there. Heh.

Also, I want to thank you for all your sweet comments on my last post. You guys are the best!!!

Happy Monday to you!

Friday, September 16, 2011

Wednesday, September 14, 2011

better

Thanks so much for all your tips and suggestions on my straight line quilting problems. I found a variety of things from the comments helped. The main thing that helped was slowing down. It's hard to slow down! Beth knows all about this. :) I also found that guiding the quilt from the sides helped immensely. I had been pulling the quilt from behind the walking foot and rushing things. Not good. Letting the walking foot do the work is really hard, but really important.  One last thing that I observed is that the stitches pulled worse on the white fabric, (which is quilter's only solids from JoAnn's) vs. the tan fabric, (which is a Wendover solid from Hancock Fabrics). All those little factors added up and contributed to my quilting mess. I did some stitch ripping and requilting and things are better. Not perfect, but better. Next time I will be definitely trying some 505 spray baste. Thanks for weighing it-it really helped me through!

Now, on to a new-ish, but not completely new WIP....
I started piecing all these little snippets into strings months ago, and today I finally got back to them. I had a fun time assembling the first block. So far, it looks better than I imagined. Here's hoping the rest of the quilt follows suit. I'm super excited about this one! Probably because it combines two of my favorites...little scraps and solids. I can't wait to make a few (or a LOT) more!!! Thankfully, I have NO shortage of scraps. :)

Happy Wednesday to you!

Friday, September 09, 2011

problems

Yesterday and today I've been working on machine quilting an almost whole cloth quilt, using organic line quilting. It's not going well and I'm quite frustrated. I'm having a lot of pulling and distorting, especially on the front of the piece. I'm using my walking foot (obviously) and I pin basted every 2-4", so I shouldn't be having problems. I'm not sure what's going wrong.
These are the ends of the quilting lines. I quilted the lines with the X's underneath first, then filled in the empty space afterward. See how the fabric bows at the end? Any suggestions for avoiding this? Or is this pretty common? I know it is for me, but I wonder if there is anyway to avoid it?
I know people suggest quilting in both directions. I did that, but look at the mess that came from it! (Cringe!) I have a very unsightly V shaped texture in the quilt. UGH! Maybe I'm looking too closely at it? OR maybe a perfectionist should not attempt this type of quilting in the first place-especially on solids? There is absolutely no cushion for error. Any suggestions or help (or shoot, even empathy) is appreciated! I'm so frustrated with all of this, but I'm too stubborn to give up. Sigh.

Ok, moving on...I had a few requests for some photos, so I thought I would oblige. 
a photo of my closet. (following up from this post.) It seems a little...revealing...to post this, but really, I have nothing to hide. This is as organized as I get. It's pretty full, eh?

And another request...
a photo of my jarred salsa. (following up from this post.) This one's for you Suzanne!

I also had a few requests for my salsa recipe. Unfortunately, I don't follow a recipe-I just make it up as I go. I get different results every time, and they are mostly good. :)

That's all I have for today. Have a good weekend!

Thursday, September 08, 2011

bartering

You probably all know, but I love a good barter. This may be the best one ever.
I traded this quilt....
for all of this! :)

You see, this spring I made a new friend at church, and she lives out in the country. She a large garden space, but since her kids are grown and gone, she doesn't need all the space. I have a small garden in my backyard, and I was looking for additional space. My children are all still at home and are always very hungry. :) Anyway, she and her husband graciously hosted my garden this summer. That whole counter full was what I picked just in one day! It's not surprising that I'm making salsa again (the third batch this year so far). I'm so thankful for a bountiful harvest!!! Gardening sure satisfies the farm girl in me and it was fun to work with my kids and my friend, too.

The quilt was something that I was just finishing up this spring about the time we were planning our gardens. When I saw her super cute house for the first time (blue with red shutters) I knew I was going to give the quilt to her as a thank you. It was a perfect match for her and she was delighted. So was I. :)

You know the best part? We both think we got the better end of the deal. Just the way a good barter should be!

Wednesday, September 07, 2011

juggling act

I've decided that for me, quilting is like a juggling act. The 3 items that I try to juggle are stash, WIP's (works in progress) and scraps. Today I'm going to do a little rundown of each area. It's no accident that this post comes on the heels of my craft room remodel. I don't want things to take over and spiral out of control again any time soon! Thanks for all your sweet comments on my new room, by the way. I'm thankful for each and every one. It was so fun for me to share it with all of you!

Ok, getting back to the subject at hand...

Stash

In the early part of the year, I was doing pretty well not feeding my stash. (key word: was) At one point, I actually saw a dent in my stash. I even took a photo to prove it.
It was a happy, happy event, albeit short-lived. August came and I had very little sewing time, but I had a lot of stash acquisitions. (Funny how that works!) Here are some of my new additions....
Children at Play fabric purchased from the lovely Thimbleanna from her little shop. This is such lovely fabric! I can't wait to play! This is a mere 16 of the 50 fabrics (!!) in the line. I love how cute it is, and still so versatile. The colors are right up my alley! Lots of good basics!
I bought this stack at Craft's Direct in Waite Park, MN. The argyle fabric (by Robert Kaufman) was a mere $3 yard!!! How on earth could I not stock up?? I bought enough for a few quilt backs, trying to think ahead to what I would most likely need/use. These are my colors, so it should be no problem! The top two fabrics were deeply discounted as well. Hurray! This trip set me back 19 yards. I learned a valuable lesson...it's better not to tally up the yardage.
These are from my favorite quilt shop ever, which closed last week. I'm soooo sad. I only bought a few things...this was actually from 2 different trips! So, at least I showed some restraint there.
I was gifted some fabric, which is always lovely! These are from my BFF Tara, for my birthday. This is some of the new Denyse Schmidt line from JoAnn's. I must be living under a rock, because I didn't even realize that she had any new stuff out. I LOVE IT! Blue and green. Mmmm, good!
My dear friend Cindy heard I was lacking PINK fabric in my stash, and she sent me a generous care package to help me out in my plight. She sent so many gorgeous things-so many different prints! It's so nice to have friends take care of you! Thank you Cindy and Tara!

There was more fabric, but that's the bulk of it. I guess all in all, not terrible. But still several quilts worth!
(Now that I blogged about them, I can let these babies mingle in my stash. Anyone else do that???)

WIP's

Oh, mylanta. I'm drowning in this area right now! I don't know how I let it get so bad.
I have 5 quilt tops done.
2 nearly completed tops.
I'm hand quilting one.
I have one basted, ready to machine quilt.
Then, I have several in block stages. I store them in donut containers, which works very well. (Don't worry, I don't eat all the donuts. I get the containers from church.) The sad thing is, this isn't all of them. Really, it's frightening. I'm not even counting anymore, which is even more frightening. I'm not counting partly because I have a few projects that I'm not sure if they qualify as WIP's or not. They are kind of in limbo. Or I'm in serious denial. Either way, I'm in deep!

I'm determined to start digging myself out of the hole this month. I'm a finisher...at least I always used to be. It's time to get back on track!

Scraps

And then there are scraps. Oh, how I love them! In fact, Penny gave me a tag line at the April retreat... "no scrap left behind". You know, I couldn't even begin to argue. :) My scraps are quite plentiful. Earlier in the year, I was on top of this, too, but things have spiraled downward. It doesn't take long! They are on the verge of needing an overhaul. I think I have too many categories and I have such a hard time parting with them! It's good that I use them as much as I do, or they would overrun the place!
This is just one of many baskets.....these are just my strings! I have big plans for these...just as soon as I finish up some other things, if I can resist that long! I just had a great idea for a string quilt last night. It's so hard not to start something new when inspiration strikes! Maybe that's how I got in the WIP mess in the first place? Heh.

SO, I'm curious to know...what is your weak point? Stash, WIP's, or scraps? What area are you doing the best in? Or are you a horrible juggler like me??? ;)

Tuesday, September 06, 2011

new and improved

22 days ago, I started my craft room remodel. Today I'm excited to proclaim that it is D-O-N-E, done! I don't know that I've been this excited about a finish. Ever. It was a TON of work, just like I had expected. But the final outcome of the room exceeds my expectations about 100 times over.
Overall, my goals were to keep things simple, clean and light. Of course I wanted to do all of this without spending much money. I bought paint and hardware and hinges, which set me back about $40. Sweet!!! I only used furniture and storage items I already had. My hubby wanted to take me to IKEA and buy a new desk, but I love my little "grandma table", as we call it.
Painting the wood work was the most time consuming thing. My husband is a gem. He's in the 1-5% of men that actually prefers white trim over wood. I am actually working on painting the trim throughtout my house. (My brother-in-laws are aghast that I would do such a thing!) It's a HUGE pain in the hinder, but the results are AMAZING!

The closet was cleaned out and organized, too, but it isn't very photogenic. It holds my stash, my WIP boxes, my quilt tops, scraps, more stash, more scraps, remnants, and various supplies/projects.
This is a little shelf I made years ago and it holds most of my pin cushion collection. I love how sweet it looks tucked up above my closet doors.
I really debated about hanging my thread storage on my wall. I also debated painting the shelf white, but I we (husband and I) decided to hang it and keep it as is. Hurray! One less thing to paint! I had so much fun arranging the thread in color order last night. I'm such a geek. And because I know someone will ask, I did a whole post about thread here.
I'm using a lid from an IKEA storage box as a tray to hold all my tools and gadgets. Keeping things tidy and in control is the goal. I think the tray will help! The little tin cans are screaming for fabric covers. It's on my to-do list and it has been for quite a long time. The coil pot was made by my son and it makes the best seam ripper holder ever.
I'm looking forward to spending many hours planted here. I'm also dreaming of making a quilted cover for my very blue chair.
My thrift store chair used to look like this. It had gotten quite grubby since I refinished it, so a new cover was in order. I used some ticking that was my grandmother's. (My stash knows no bounds!) I love how easy it is to change the look of this chair. I've done it many times over the years. It's currently holding a few WIP's, but it's ready for a visitor at any time. :) The huge green bowl is something that I picked up from Target several years ago.
I  placed a few containers on my desk to help keep me organized. My cutting scraps will go in the box to the left. I will sort it when it gets full. The container on the right is for ticker tape pieces. I may end up moving these to my cutting area, if I have room. I haven't fully broke in my new space yet, so we shall see!

The pattern for the circle box is from the book Scandinavian Stitches. It is such a cute and fun project! I should note, I made the sides a bit taller than the pattern calls for. After I made it, I just happened to discover that a recycled food container fit inside it perfectly, which helps hold the shape. Such a happy accident!
The buffet was my grandmother's, and it's going to be my cutting station. I wish it were deeper, but I'm going to make it work. If I have to do some larger cutting, I plan to use a bigger cutting mat on the floor.

My red polka dot "hold everything boxes" have been used in 3 different rooms of my house now. LOVE that! Currently, they hold my pre-cuts and fabric bundles.

The little drawers on the left hold some fabric scraps and little things...snaps, tools, all kinds of stuff.

The mini quilt was made by Anne Day, and I received it in a swap her and I did. I just love it and love how it fits in here so well!

The buttons on the top of the buffet are color coded. It's a sickness.

The jar on the right holds fabric scraps. (Imagine that!)

It was a huge PAIN to paint the french door, but it sure looks pretty white!
This is probably the only time my desk will be this clean. I love, love, love having my desk beneath the window.
Here's my floor to ceiling design wall. I used a king size flat flannel sheet and I attached it to the wall with thumb tacks. Previously, I had attached it with staples, which worked, too. This looks cleaner and neater. When I took the sheet down to paint, I washed and dried it, so it's almost thread free again. Yay! What a nice side effect to this whole project.
Here's one last shot. I was going to try to be brief, but that was an epic fail. Anyway, I hope you enjoyed the tour. ;) I'm excited to see the results of all my hard work! Now it's time to get busy and mess it up again! Speaking of messes, I still have a bunch of stuff that I took out of the room that I need to toss/donate/find a new home for. I don't want to appear on the show hoarders anytime soon!

I was telling my husband last night just how thankful I am to have this room. So very thankful! I love having a place where I can leave everything set up and waiting until I have a chance to get back to my work, because we all know how many interruptions a mama has. :)

Just a few more details...

I used Zinsser Bullseye 1-2-3 primer for the walls to cover the red (and the woodwork, for that matter). That stinky stuff does wonders! I had no trouble covering the red at all. Oh, I am so thankful!

The wall color is woven basket (B22-3) from Ace Hardware. I chose flat paint for the first time ever and I loved it! It only took 2 coats, which is pretty normal, from my experience. I LOVE Ace paint!

The trim color is macaroon cream. I had it color matched from an old paint chip. My daughter likened it to the color of cream cheese, which made me laugh and laugh, but she is exactly right!

Ok, now I'm done now.
For real.
I'm gonna go sew.
Happy Tuesday!